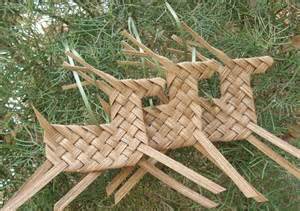
Reed Raindeer Ornament
 Pattern adapted from free pattern http://www.ourveggiegarden.com/CraftsReindeerOrnament.htmlMaterials: Pattern adapted from free pattern http://www.ourveggiegarden.com/CraftsReindeerOrnament.htmlMaterials:
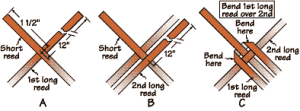
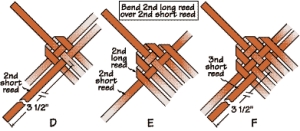
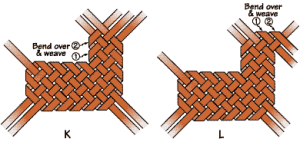
3- ¼” flat 12 inches in natural or smoked 2 – ¼” flat 24 inches in natural 1) Soak all the reed pieces in water until bendable. Keep reed pieces damp as you weave. 2) Follow illustrations A through M below and pack reed tightly as you go.
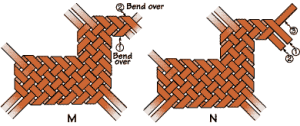
3) To finish off, refer to Illustration N. Bend reed #1 behind reed #3, cut off excess reed, leaving a long enough piece to tuck under a weaver (reed) in back. Bend reed #2 behind reed #1, cut off excess reed, leaving a long enough piece to tuck under a weaver (reed) in back. Bend reed #3 behind, cut off excess reed, leaving a long enough piece to tuck under #2 weaver (reed) in back. 4) Cut the 4 reindeer legs to 3 inches from the body, make an angle cut for tail about 1 inch from the body, cut the 2 ears to a point 3/4 inch from head. See photo. Note: variations in cutting tail, legs, and ears or antlers create doe or stag. Be creative! 5) Trim and cut antlers, hooves, and tail. Add bow and ribbon to hang if desired. For antlers I like to cut them vertically part way down the center and then while wet, curl them over a pencil. Some like to cut them vertically in half part way and then fold each down at different lengths. 6) Decorate with ribbon if desired. For hanger, slip a thin ribbon through one of the reeds on the deer’s back and tie ends together to create a loop. |